
Photeeq Lens Flare is one of the most captivating effects in photography, capable of transforming ordinary images into visually striking compositions. Among the tools designed to simulate and enhance this effect, Photeeq Lens Flare stands out as a versatile and intuitive solution for photographers and digital artists alike. By carefully controlling light, glare, and reflections, Photeeq allows creators to introduce realistic or artistic flare effects that elevate their photos and videos.
Lens flare has a dual nature—it can either enhance a scene dramatically or distract from the subject if misused. This is why understanding how to use it properly is crucial. Whether you are shooting landscapes, portraits, or cinematic sequences, a thoughtfully applied flare can convey warmth, drama, or artistic flair. Conversely, overdoing it can ruin a carefully balanced image.
This article delves deep into Photeeq Lens Flare, exploring what it is, how to use it effectively, and creative techniques for achieving professional-quality results. Readers will gain practical insights into avoiding common mistakes, experimenting with advanced features, and integrating lens flare seamlessly into their workflow. By the end, both beginners and experienced photographers will be better equipped to use lens flare to enhance the mood, depth, and visual impact of their photography.
What is Photeeq Lens Flare?
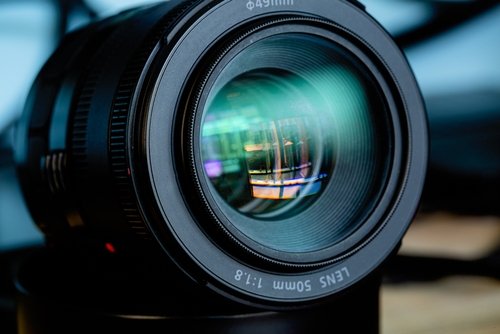
At its core, a lens flare is a visual artifact created when bright light interacts with a camera lens. This effect can manifest as streaks, rings, or soft glows, and is often considered a hallmark of high-quality cinematography or dynamic photography. Photeeq Lens Flare is a digital tool that replicates these effects artificially, allowing photographers to add controlled flare to images post-production or during shooting with compatible software.
The Photeeq Lens Flare tool offers a variety of customizable effects, from subtle glows that simulate sunlight to dramatic streaks that mimic cinematic lighting. Users can choose from multiple flare types, including circular, streaked, or multi-colored patterns, depending on the desired aesthetic. This versatility makes Photeeq suitable for both realistic and creative applications.
Photographers often use lens flare to evoke certain emotions or atmospheres. For example, a soft golden flare can convey warmth and nostalgia in a portrait, while a sharp, multicolored streak may enhance futuristic or cinematic imagery. By understanding the types of lens flare available in Photeeq, users can carefully craft the visual mood of their images, blending artistic intention with technical precision.
Ultimately, Photeeq Lens Flare bridges the gap between natural lens artifacts and digital creativity, giving photographers precise control over light effects that would otherwise be unpredictable in real-world shooting conditions.
How to Use Photeeq Lens Flare
Using Photeeq Lens Flare effectively requires understanding both the technical controls and aesthetic principles of photography. Beginners should start by familiarizing themselves with the software interface, which typically includes options to adjust intensity, angle, color, and size of the flare. These controls allow precise placement, ensuring that the effect complements the main subject rather than overpowering it.
Positioning is critical. For instance, a flare should often align with the light source in the image to maintain realism. Users can experiment with subtle adjustments in angle or size to find the perfect balance. The intensity slider helps prevent the effect from being too harsh or artificial, allowing for a more natural glow. Similarly, adjusting color can harmonize the flare with the scene’s lighting conditions, whether warm sunlight or cool moonlight.
Photeeq also provides presets that simplify the workflow for beginners, allowing them to apply commonly used flare styles with one click. As users gain experience, they can combine multiple layers of flare or customize shapes for unique effects. Experimenting with these settings helps photographers learn how light interacts with lenses, translating that knowledge into more convincing compositions.
Additionally, using Photeeq Lens Flare requires patience and attention to detail. Overuse can detract from the subject, while underuse might make the effect unnoticeable. The key is subtlety—enhancing the image without distracting viewers from the primary focal point. By mastering these fundamentals, photographers can use Photeeq to create compelling, professional-quality visuals.
Creative Applications and Techniques
Photeeq Lens Flare is not just a technical tool—it’s a creative asset that can dramatically transform the visual narrative of your images. In portrait photography, a soft, warm flare can add a golden-hour glow that enhances skin tones and conveys an inviting atmosphere. The strategic use of flare can also draw attention to the subject’s face, subtly guiding the viewer’s eye while adding depth and dimension.
In landscape and outdoor photography, lens flare can emphasize sunlight, atmospheric haze, or reflections on water surfaces. For instance, a gentle sunbeam streaking across a mountain peak or lake can create a sense of realism and immersion, elevating a simple scene into a captivating visual story. Combining multiple flares at different angles can simulate dynamic lighting conditions, such as sunrise or sunset, to achieve dramatic effects.
Cinematic photography and digital art also benefit from Photeeq Lens Flare. In film-inspired shots, creative flares can simulate light leaks, spotlight effects, or even futuristic neon glows. By layering different flare types and experimenting with transparency and blending modes, photographers can develop complex compositions that capture attention and evoke emotion.
The key to creative success with Photeeq lies in experimentation. Users should combine technical precision with artistic intuition, testing different placements, colors, and intensities. Observing how light naturally interacts with real-world objects can guide the creation of realistic yet visually striking flares that enhance storytelling and mood.
Common Mistakes and How to Avoid Them

While Photeeq Lens Flare is powerful, overusing or misapplying it can ruin an otherwise excellent photograph. One common mistake is excessive intensity, which makes the flare appear artificial and distracting. Balancing the effect with subtlety ensures it complements rather than dominates the composition.
Incorrect positioning is another frequent issue. A flare that doesn’t align with the light source can break the realism of the image. Paying close attention to light angles, shadows, and reflections is essential for maintaining natural-looking effects. Similarly, improper color selection can clash with the scene, making the effect appear forced rather than integrated.
Many photographers also neglect blending and layering techniques. A poorly blended flare may look pasted onto the photo, breaking immersion. Utilizing opacity adjustments, gradient masks, and layer blending can help the flare integrate seamlessly into the image. Overcomplicating the effect with multiple mismatched flares is another pitfall to avoid.
Finally, beginners often fail to consider the subject’s context. Applying lens flare indiscriminately over the main focal point can obscure important details. Ensuring that the effect enhances rather than obstructs key elements is crucial. By avoiding these mistakes, users can harness Photeeq Lens Flare effectively to create professional, visually compelling images.
Advanced Tips and Tricks
For advanced users, Photeeq Lens Flare offers numerous ways to push creative boundaries. Customizing flare shapes and patterns allows photographers to experiment with unique designs that align with their artistic vision. Polygonal, star-shaped, or abstract flare patterns can add a distinct signature to images.
Combining multiple flares can simulate complex lighting conditions, such as sunlight filtering through trees or reflections bouncing off water surfaces. Layering and blending flares with different intensities, angles, and colors enhances realism while providing dramatic visual interest. These techniques require patience and careful observation but can produce extraordinary results.
Post-production workflows also benefit from Photeeq Lens Flare. Adjusting flare properties after capturing the image allows fine-tuning for specific effects, ensuring that the final composition matches the intended mood and lighting. Integration with popular photo-editing software further streamlines this process, allowing seamless adjustments alongside color correction, contrast, and sharpening.
Advanced photographers can also experiment with combining Photeeq Lens Flare with other effects, such as bokeh, glow, or vignette, to create cinematic and immersive visuals. By mastering these techniques, users elevate their photography beyond technical competence into the realm of artistic storytelling, using light as a powerful narrative tool.
Conclusion
Photeeq Lens Flare is more than just a digital tool—it is a gateway to creative expression, allowing photographers to manipulate light in ways that enhance mood, depth, and visual storytelling. From subtle enhancements in portraits to dramatic cinematic effects, lens flare has the power to transform ordinary photos into extraordinary imagery.
By understanding the fundamentals, avoiding common mistakes, and experimenting with advanced techniques, users can harness Photeeq Lens Flare to its fullest potential. Whether for professional projects or personal creative endeavors, the key lies in balancing technical precision with artistic intuition.
Ultimately, Photeeq Lens Flare empowers photographers to explore the interplay of light and lens, providing tools to craft images that captivate, inspire, and leave a lasting impression.
Frequently Asked Questions (FAQs)
What is Photeeq Lens Flare used for?
Photeeq Lens Flare is used to add realistic or artistic light effects to photos, enhancing mood, depth, and visual appeal.
Can Photeeq Lens Flare be applied to any photo?
Yes, it can be applied to most digital images, though it works best when aligned with existing light sources for realism.
How do I make lens flare look natural in my images?
Ensure correct placement, adjust intensity, match colors with the scene, and blend using opacity or gradient masks.
Is Photeeq Lens Flare suitable for beginners?
Yes, it offers presets and intuitive controls, making it accessible for beginners while providing advanced options for professionals.
What are the common mistakes when using lens flare?
Overuse, incorrect positioning, unnatural colors, and blocking the main subject are frequent mistakes to avoid.
Can I customize lens flare shapes and colors?
Yes, Photeeq allows users to customize flare shapes, patterns, intensity, and color to fit creative needs.
Does Photeeq Lens Flare work with all editing software?
It is compatible with most major photo and video editing platforms, though some advanced features may require specific integrations.
You May Also Read: TLK Fusion Complaints